
I am in happy mood today as Izzah has started to know how to float herself and swim. She can swim about 2 or 3 meters, but not more than that. But I am so impressed with the progress...because we just on our 4th session, and teaching by a non-pro swimmer.. ME hahaha
Here I wanted to share with you on how to do your own make up bag..

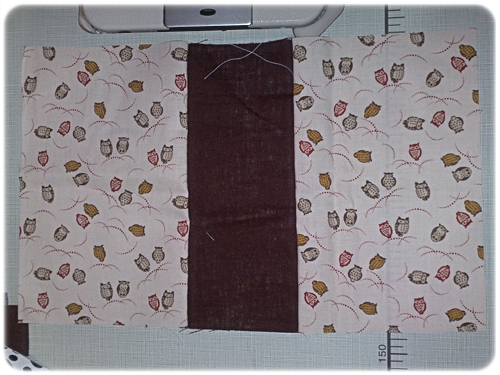
Things that we need (measurement in inch):
2 pieces Outer Fabric =8.5 x 5.5
2 pieces Lining fabric =8.5 x 7
Bag bottom =8.5 x 3.5
1 piece lining fabric for pocket =8.5 x 4 (Optional)
Bag bottom fabric about 6 x 1.5 for zipper end closure
Zipper + Zipper head
Thin batting

Sew the bag body to the bag bottom, then measure & cut your batting. I usually didnot precut the batting as I dont want it to waste incase of overize or under.
Then top stich the joining together with batting at the back

Add some texture to the bag body by simple quilt.

Attach the pocket to the ling fabric

I added a handmade label and a ribbon here, embellish as you wish :)

Measure the zipper: the zipper should at least smaller that the length of the bag by 1/2 inch. Here it should be 8 inch

Put in the zipper head and cut a piece of fabric that can bind the zipper end. Hope the picture well explained my bad wording here LOL

Fold the zipper end and sew on top if it.

Make it on both sides

The attached the zipper to the bag body and the lining

Top stitch the zipper, but up only to the zipper end, not till the end of the body fabric.

Then attached the other side to the zipper

Top sttich it, sorry but here its a bit difficult to do, because its in a small hole of the bag body.

Now fold in the one inside the red-green box below (I will show in the next picture on how to fold it.
Sew through the red line and leave a small hole at the bottom of the bag lining.

Fold the bag bottom like this and sew on top of it

Make sure not to sew the zipper end here..

On the bag lining, measure about 2.5 inch and sew it

Turn the bag inside out through the small hole on the lining, and close the opening on the bag lining bottom

Tadaaa... here is the outcome.. I put in a wristlet with a swivel clasp to the zipper.

Thanks for reading this. if you are inspired with this tutorial, please link back to me. It makes me feel appreaciated after spending hours on this tutorial... :)
Regards;

salam mila... rajin nyer wat tuto... akak suke part jait zip tu...insy..one dah nak cuba:)
BalasPadamlike2....tq for sharingg...
BalasPadamThanx Mila for the effort taken to post this tutorial..will definitely give it a try..lama betul tk buat beg..rindu sesangat.
BalasPadamGreat tutorial, I will try the wa you fold the bottom, I learned this technique with KeykaLou pattern for grocery bag but I don't normally use it.
BalasPadamtq... kongsi ilmu
BalasPadamSuka...suka...suka ...heheheh
BalasPadambest tutorial nie..clear paham every step ^ ^
BalasPadambest tutorial nie..clear paham every step ^ ^
BalasPadamtima kasih sudi kongsi ilmu....Insya'allah akan di gunakan sebaik²nya....
BalasPadamHelo, I used your method and linked to your tuto:
BalasPadamhttp://couturealamaison.blogspot.com/2012/02/une-autre-trousse-maquillage.html Thanks for this method.
This is great - thank you so much for posting it.
BalasPadamSalam Mila,
BalasPadamNak tanya, mana nak beli penyangkuk beg tu?
Tq
Teratak Hami... kalau kat KL ni di Bunga reben & Kimloong ada jual
BalasPadamCantik.....
BalasPadamI love the way you explained each details of work done.
BalasPadamVery appreciate that..
Keep it up and keep posting your words.